No Bake Chocolate Cheesecake Lasagna
Description
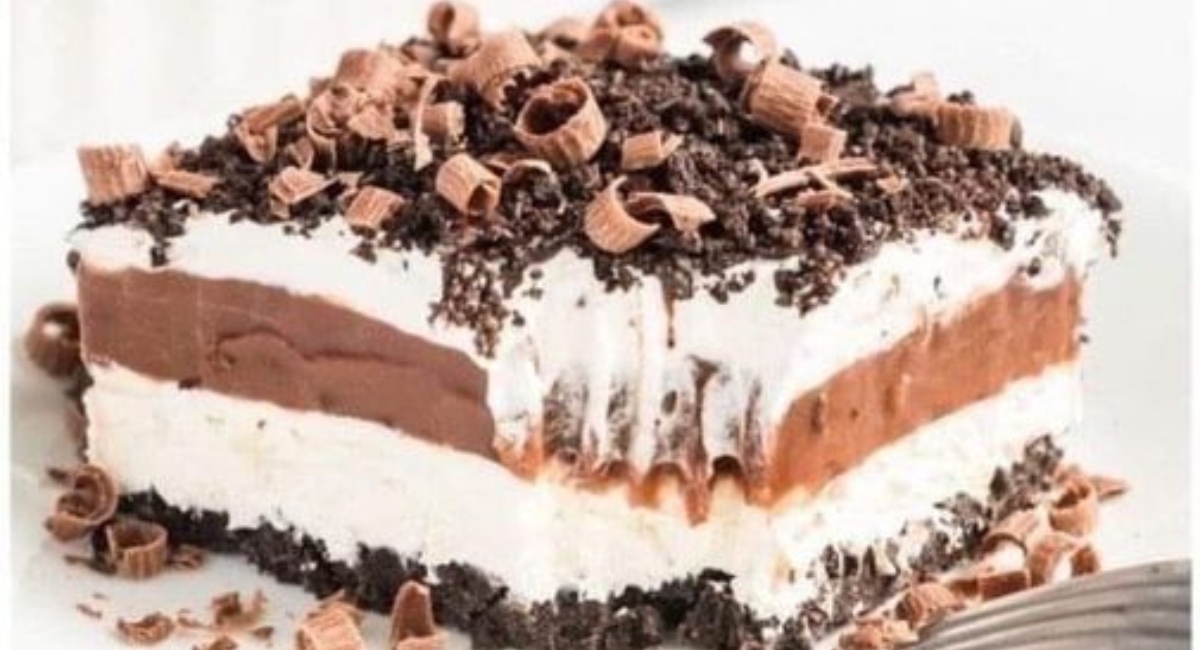
Imagine a decadent dessert that's not only visually stunning but also layered with rich flavors that tantalize the taste buds. Welcome to the No Bake Chocolate Cheesecake Lasagna, an exquisite dessert that is sure to impress your family and friends, and become a treasured part of your dessert repertoire.
This dish artfully combines the creamy goodness of cheesecake with the indulgent satisfaction of chocolate pudding, all cradled in a crunchy pecan crust. It’s a delightful creation that doesn’t require any baking—making it a stress-free option for gatherings and special occasions. The contrast between the silky vanilla and chocolate puddings topped with the light and fluffy Cool Whip creates a harmonious medley of textures that is simply irresistible.
Whether you’re hosting a dinner party, celebrating a birthday, or simply looking for a sweet treat to enjoy at home, this No Bake Chocolate Cheesecake Lasagna is the perfect choice. Each layer offers a unique experience—from the nutty crust that crunches delightfully beneath the creamy fillings to the luxurious chocolate topping that makes each bite an unforgettable pleasure. Plus, it holds sentimental value for many, reminiscent of family gatherings and joyful celebrations. When you pull this dessert out of the fridge, expect the amazed reactions from everyone around you—they won’t be able to resist!
Ingredients
- For the crust:
- 1 cup pecans, chopped
- 1 cup all-purpose flour
- ½ cup unsalted butter, melted
- 3 tablespoons granulated sugar
- For the cheesecake layer:
- 8 ounces cream cheese, softened to room temperature
- 1 cup powdered sugar
- 1 cup Cool Whip
- For the vanilla pudding layer:
- 2 cups whole milk
- 1 packet (3.4 ounces) instant vanilla pudding mix
- For the chocolate pudding layer:
- 1 packet (3.4 ounces) instant chocolate pudding mix
- 2 cups whole milk
- For the topping:
- 2 cups Cool Whip
- Chocolate shavings for garnish
Preparation Method
1. Prepare your workspace and gather ingredients.
2. Make the crust by mixing chopped pecans, sugar, flour, and melted butter until it resembles damp sand.
3. Grease a 9x13-inch baking dish and press the mixture into the bottom evenly.
4. Bake the crust in a preheated oven at 350 degrees Fahrenheit for 20 minutes until golden brown.
5. Let the crust cool completely on a wire rack.
6. Prepare the cheesecake layer by beating softened cream cheese until smooth, then mix in powdered sugar and fold in Cool Whip gently.
7. In two separate bowls, prepare the vanilla pudding by whisking the mix with 2 cups of cold milk until thickened, then set aside.
8. Prepare the chocolate pudding similarly with another 2 cups of cold milk and set aside.
9. Spread the cheesecake mixture evenly over the cooled crust.
10. Layer the vanilla pudding over the cheesecake, followed by the chocolate pudding.
11. Spread the remaining Cool Whip over the chocolate pudding layer.
12. Garnish with chocolate shavings or curls.
13. Cover with plastic wrap and refrigerate for at least 2 hours.
14. Let it sit for a few minutes before slicing and serving.
Tips and Conclusion
For an extra touch of flavor, consider adding a layer of fresh berries, such as raspberries or strawberries, before topping with the Cool Whip. These vibrant fruits will add a refreshing pop of color and tartness, balancing the sweetness of the dessert beautifully.
If you need to store leftovers or want to make this ahead of time, cover it tightly with plastic wrap and refrigerate. It stays fresh and delicious for up to 4 days—though I very much doubt it will last that long!
Creating the No Bake Chocolate Cheesecake Lasagna is not just about preparing a dessert; it’s an adventure of flavors that brings joy to any occasion. From its crunchy pecan crust to the creamy layers of cheesecake and pudding, every bite tells a story of indulgence and satisfaction.
This recipe is not only easy to follow but also provides endless possibilities for customization. As you explore this delightful dessert, consider pairing it with a cup of coffee or tea to elevate your dessert experience to even greater heights.
Be sure to check out related recipes on our site, from other no-bake desserts to delicious cakes and cookies, all sure to delight and inspire. Having enjoyed making this fabulous dessert, feel free to share this recipe with family and friends, inviting them to experiencia the joy that comes with creating delightful desserts. Happy cooking!

