Learn Recipes Easy

Strawberry Crunch Cheesecake Pops
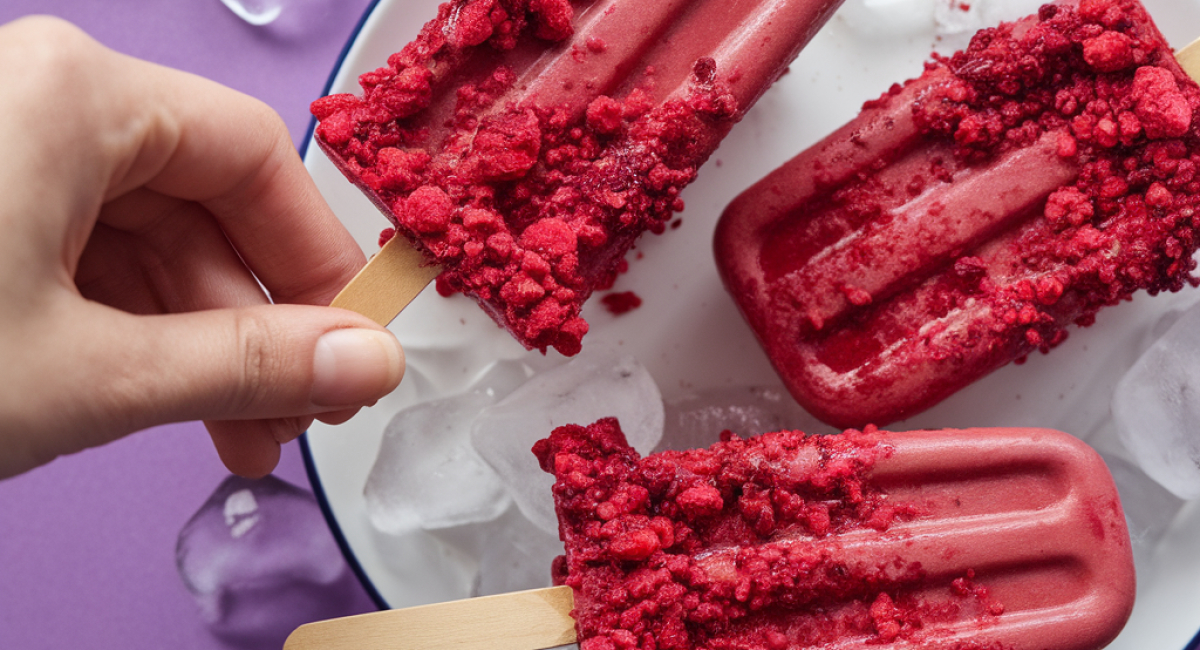
Strawberry Crunch Cheesecake Pops

Description

Imagine a delightful summer day, the sun shining brightly, and a gentle breeze rustling through the trees. What could be better than enjoying a refreshing treat that combines the luscious sweetness of strawberries with the creamy richness of cheesecake? Strawberry Crunch Cheesecake Pops are not just a dessert; they are a vibrant celebration of flavors and textures. These delightful frozen treats are perfect for warm weather gatherings, picnics in the park, or simply as a sweet indulgence at home.

Originating from the classic cheesecake, which has been a beloved dessert for centuries, this popsicle version takes it to a whole new level. The bright red strawberries bring a pop of color, while the crunchy topping adds an irresistible texture that contrasts wonderfully with the smooth cheesecake filling. What makes these pops truly special is how simple they are to prepare. With just a few ingredients and minimal effort, you can create a dessert that looks like it came straight from a gourmet kitchen.

Whether you’re a seasoned baker or a novice in the kitchen, these Strawberry Crunch Cheesecake Pops will thrill your taste buds and impress your friends and family. Plus, they can be made ahead of time, allowing you to enjoy the moment without the stress of last-minute preparations. Get ready to indulge in a sweet treat that’s as fun to make as it is to eat!

Ingredients

Preparation Method

To start, gather all your ingredients and tools. Having everything on hand will make the process smoother and more enjoyable. Begin by preparing the strawberry layer. In a medium mixing bowl, combine the sliced strawberries, granulated sugar, and lemon juice. Gently toss the strawberries to coat them evenly with the sugar and lemon juice. This will help draw out the natural juices, creating a deliciously sweet strawberry mixture. Allow the berries to sit for about 15 minutes. While they’re resting, you’ll notice the sugar dissolving and the strawberries becoming juicy.

Next, it's time to whip up the creamy cheesecake filling. In a large mixing bowl, beat the softened cream cheese until it’s smooth and fluffy. This may take about 2-3 minutes of mixing; don’t rush this step, as the texture of the cheesecake will depend on how well you blend it. Gradually add the powdered sugar and continue to beat until it’s fully incorporated and silky. Add the vanilla extract for a hint of flavor, and then in a separate bowl, whip the heavy cream until stiff peaks form. Gently fold the whipped cream into the cream cheese mixture, being careful not to deflate the whipped cream. This step is crucial, as it gives the cheesecake filling its light and airy texture.

Once your cheesecake filling is ready, it’s time to prepare the crunchy topping. In a medium bowl, combine the graham cracker crumbs, melted butter, brown sugar, and cinnamon. Mix until all the crumbs are evenly coated in the butter and the mixture resembles wet sand. This topping will provide a satisfying crunch that complements the creamy filling perfectly.

Now, it’s time to assemble your pops. Start by adding a layer of the cheesecake filling to the bottom of each popsicle mold, filling them about a third of the way full. Use a spoon or spatula to smooth it out evenly. Next, add a generous layer of the prepared strawberry mixture on top of the cheesecake filling. Spoon in as much as you like, but be mindful not to overfill the molds. The fresh strawberries will add a burst of flavor and a beautiful contrast to the rich cheesecake.

After the strawberry layer, go back to the cheesecake filling and add another layer, filling the molds about two-thirds full. Finally, sprinkle the crunchy topping generously over the top of each popsicle. Press it down gently to ensure it sticks to the cheesecake filling. Insert the popsicle sticks into the center of each mold, making sure they stand upright.

Place the molds in the freezer for at least 4-6 hours or until the pops are completely frozen. The longer they freeze, the easier they will be to remove from the molds. If you’re in a hurry, a minimum of 4 hours should suffice. However, overnight freezing is ideal if you can wait.

When you’re ready to enjoy your Strawberry Crunch Cheesecake Pops, carefully remove them from the molds. If they’re stubborn, run warm water over the outside of the molds for a few seconds to loosen them. Serve immediately for the best texture and flavor, or store any leftovers in an airtight container in the freezer. They can last up to two weeks, but I doubt they will last that long once your family and friends get a taste!

Tips and Conclusion

For an extra twist, consider adding a layer of chocolate ganache or a drizzle of chocolate over the top of your pops before serving. Simply melt some chocolate, let it cool slightly, and then drizzle it over the pops for a touch of decadence. If you’re looking for a healthier alternative, feel free to substitute the granulated sugar in the strawberry layer with honey or maple syrup. Additionally, you can swap out the strawberries for other berries like blueberries or raspberries for a fun variation. These cheesecake pops are versatile, allowing you to customize them based on your preferences or seasonal fruit availability.


Creating Strawberry Crunch Cheesecake Pops is not just about making a dessert; it's about crafting a delightful experience that you can share with loved ones. The joy of preparing these pops and the anticipation of savoring them on a sunny day is what makes cooking truly special. These pops are bursting with flavor, offering a perfect balance of creamy, fruity, and crunchy textures that will leave everyone wanting more.

As you enjoy your homemade treats, don’t forget to explore other delicious recipes on the site, such as classic cheesecake, fruit sorbets, or even other frozen desserts to expand your culinary repertoire. Feel free to share this recipe with friends and family, encouraging them to join in on the fun of making these delightful pops. Happy cooking, and may your kitchen always be filled with joy and delicious aromas!

Recommended Recipes

Add eggs to boiling water and you will be amazed at the result!
I'm obsessed with this recipe! It tastes even better the next day... if you can resist!
ROASTED SWEET POTATOES
Eggs and Hash Browns Skillet
Homemade Beefaroni
Homemade Beefaroni
Maid-Rite Sliders Casserole
Apple Fritter Bread
Apple Fritter Bread
Creamy Cheddar Broccoli Potato Soup – Cozy and Comforting