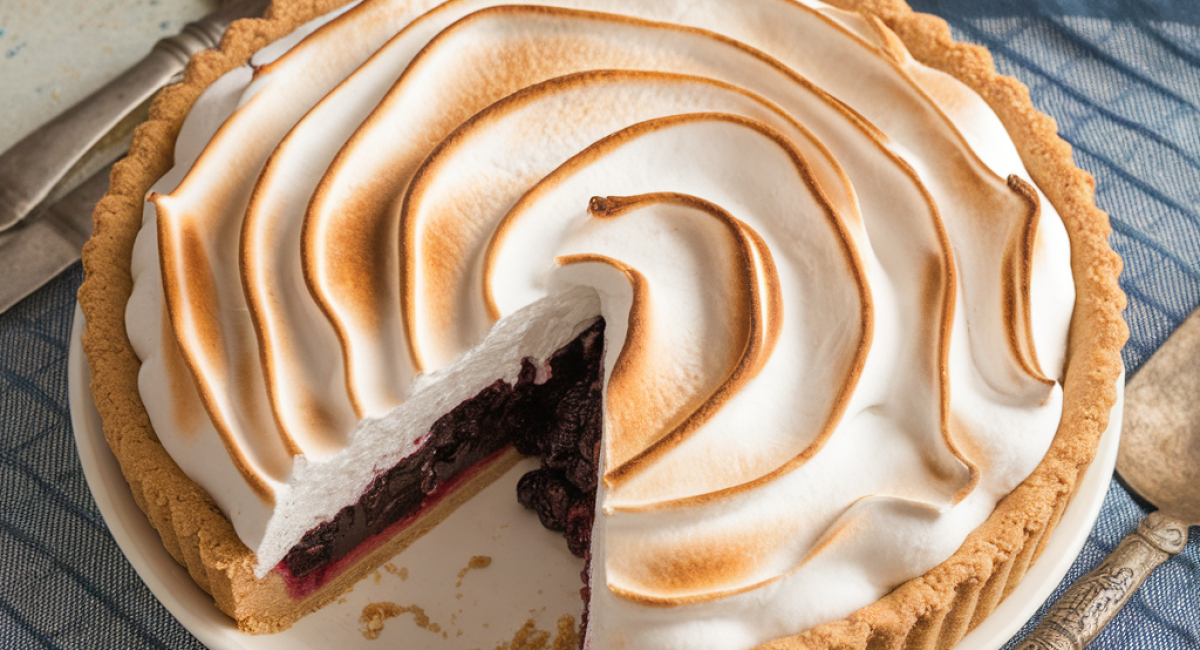
Indulging in a slice of Old Fashioned Chocolate Pie with Golden Meringue is like taking a delightful journey back to simpler times. This classic dessert has graced family tables for generations, often serving as the centerpiece for holiday gatherings, birthday celebrations, or just a cozy evening at home. The rich, velvety chocolate filling, enveloped in a perfectly baked pie crust, is crowned with a fluffy, golden meringue that adds just the right amount of sweetness and texture.
What makes this pie truly special is its nostalgia. Many of us can recall the smell of chocolate wafting through the kitchen as our grandmothers whisked up a batch, bringing warmth and joy to the home. This recipe not only captures that essence but also makes it easy enough for anyone to recreate. Whether you’re an experienced baker or a novice in the kitchen, this pie welcomes you with open arms.
As you prepare this chocolate pie, you'll discover the joy of working with familiar ingredients while creating something extraordinary. The satisfaction of serving a homemade dessert that dazzles your family and friends is unparalleled. So gather your ingredients and let’s get started on this sweet journey!
To begin, let’s prepare the pie crust. In a large mixing bowl, combine the flour and salt. Add the chilled, cubed butter to the bowl. Using a pastry cutter or your fingers, cut the butter into the flour mixture until it resembles coarse crumbs. You want to see small pieces of butter throughout, as they will create a flaky texture in the crust.
Next, stir in the sugar. Gradually add the ice water, one tablespoon at a time, mixing gently until the dough comes together. Be careful not to overmix; you want just enough moisture to hold the dough. Once combined, shape the dough into a disk, wrap it in plastic wrap, and refrigerate for at least 30 minutes. This resting time allows the gluten to relax, making the dough easier to roll out later.
After the dough has chilled, preheat your oven to 350°F (175°C). On a lightly floured surface, roll out the dough into a circle about 12 inches in diameter. Transfer the dough to a 9-inch pie pan, gently pressing it into the corners. Trim any excess dough hanging over the edges, and crimp the edges for a decorative touch. Prick the bottom of the crust several times with a fork to prevent it from bubbling up during baking.
Now, let’s blind bake the crust. Place a piece of parchment paper over the crust and fill it with pie weights or dried beans. Bake in the preheated oven for about 15 minutes, then remove the weights and parchment paper. Return the crust to the oven and bake for an additional 10-12 minutes or until it’s lightly golden. Once done, remove the crust from the oven and set it aside to cool.
While the pie crust is cooling, it’s time to prepare the luscious chocolate filling. In a medium saucepan, whisk together the granulated sugar, cocoa powder, cornstarch, and salt. Gradually whisk in the whole milk, ensuring there are no lumps. Cook the mixture over medium heat, stirring constantly until it begins to thicken and bubbles form. This process usually takes about 8 to 10 minutes.
Once the mixture is thickened, remove it from the heat. Take a small amount of the hot mixture and whisk it into the beaten egg yolks to temper them. This step is crucial, as it prevents the yolks from scrambling when added to the hot mixture. After tempering, whisk the egg yolk mixture back into the saucepan. Return to the heat and cook for another 2-3 minutes, stirring constantly until it thickens further.
Now, remove the saucepan from the heat and stir in the butter and vanilla extract. The butter will melt and enrich the filling, adding a lovely gloss. Pour the chocolate filling into the cooled pie crust, smoothing the top with a spatula. Allow it to cool for about 15 minutes at room temperature, then transfer it to the refrigerator to set while you prepare the meringue.
To make the golden meringue, start by ensuring your mixing bowl and beaters are completely clean and free of any grease. This is important for achieving stiff peaks. In a large, clean mixing bowl, beat the egg whites with an electric mixer on medium speed until they become frothy. Add the cream of tartar, which stabilizes the meringue, and continue beating until soft peaks form.
Gradually add the granulated sugar, one tablespoon at a time, while continuing to beat the egg whites. It’s essential to add the sugar slowly, allowing it to dissolve completely. Continue beating until stiff, glossy peaks form, and then mix in the vanilla extract.
Once the chocolate filling has set and cooled, take it out of the refrigerator. Spread the meringue over the chocolate filling, ensuring it reaches the edges of the crust to prevent shrinking. Use the back of a spoon to create decorative peaks and swirls on the surface of the meringue.
Now it’s time to bake the pie! Place the pie in a preheated oven set to 325°F (160°C) for about 10-15 minutes or until the meringue is golden brown. Keep a close eye on it, as meringue can quickly go from perfectly golden to burnt. Once done, remove it from the oven and allow it to cool at room temperature for about an hour.
After cooling, refrigerate the pie for at least two hours to allow the filling to fully set before slicing. This will also help the meringue maintain its structure and texture.
If you want to elevate this classic dessert, consider adding a hint of espresso to the chocolate filling. Simply add one teaspoon of instant espresso powder when combining the dry ingredients. This will enhance the chocolate flavor and give it a delightful depth. Additionally, if you have leftovers, store them in the refrigerator covered with plastic wrap to prevent the meringue from weeping. Enjoy the pie within a couple of days for the best texture.
Preparing this Old Fashioned Chocolate Pie with Golden Meringue is not just about the end result; it’s about the experience and the memories it creates. From the moment you roll out the pie crust to the final golden peaks of meringue, every step is filled with love and anticipation. The moment you slice into the pie and reveal the rich chocolate filling, you’ll feel a wave of satisfaction that only homemade desserts can bring.
Whether you’re sharing it with family, friends, or simply enjoying it yourself, this pie is sure to bring smiles and delight. If you loved this recipe, why not explore other delicious treats on our site? You might find other nostalgic desserts or innovative twists on classics that will inspire your next baking adventure. Don’t forget to share this recipe with fellow chocolate lovers and encourage them to create their own memories in the kitchen. Happy baking!